| (1) Import Invoice Data Entry |

|
Summary |
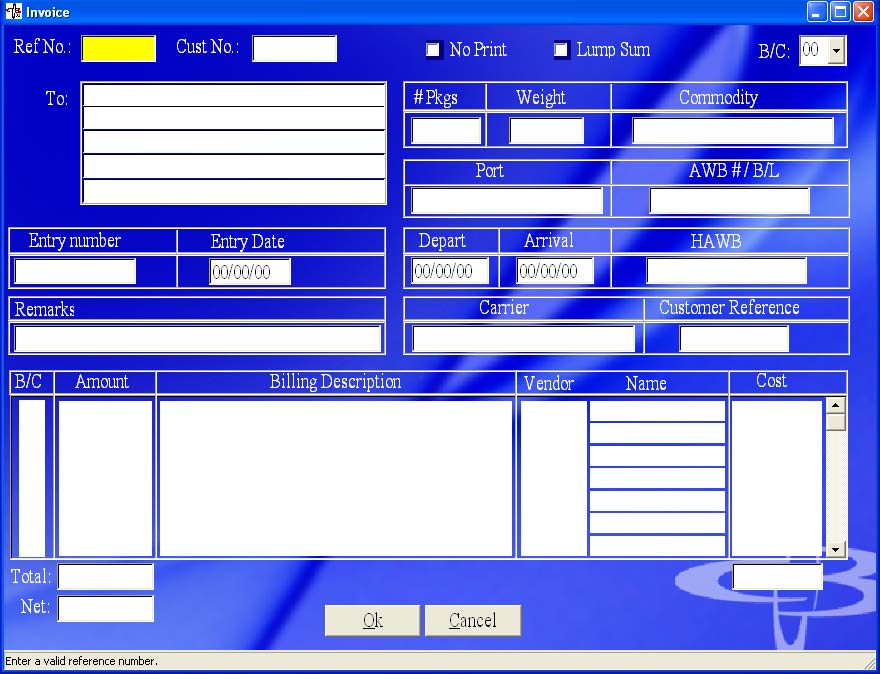
There are two options for Import Invoice Data Entry. The user may enter invoice data in Accounting Invoicing or within Key 7501 to Print File. Most users will create the invoice while keying the 7501. This Accounting option has been provided to create invoices outside of keying 7501. You can not use the Accounting Invoice program to create Export invoices. The user can only create Export invoices while keying Ocean or Air. Other features: Edit, View, Re-Print and Delete Invoices that have not been Posted to Sales. See bottom of page for instructions if Invoices have been Posted to Sales. |
To Enter Invoice Data:
To Edit/View or Re-print an Invoice that has not been Posted to Sales: (see below if Posted to Sales)
To Delete an Invoice that has not been Posted to Sales:
For Invoices that have been Posted to Sales:
You can edit, re-print and delete as much as you would like before you Post to Sales. After you have Posted to Sales you can not edit an invoice. You must create a new invoice to apply the corrections. To re-print an invoice that has already been Posted to Sales you must go to Inquiry of Accounts Receivable and follow the instructions on how to Re-Print an Invoice. To delete an invoice you must create a new invoice and reverse out the charges.
|
Field Name |
Description |
| Ref No. | If this is an originating document a pop-up will warn that the reference is not on file. You will be asked if you would like to add. Respond Yes if it is an originating document, No if you have already created a reference. Check to make sure the reference is correct. 2. Invoice data (Customer Name, address etc) will automatically appear for a keyed reference. Right Click for Exchange Inquiry, Notes and Waiting) |
| Cust No. | All invoices must have a customer number. Right Click for Customer Number Inquiry. |
| No Print | This box will automatically be checked after printing an invoice. Check this box when you do not want to print an invoice. To re-print an invoice you must remove the check. |
| Lump Sum | This option allows the user to break down billing by billing code for accounting purposes, but to create an invoice with one lump sum invoice. Select Lump Sum by checking the box. |
| B/C | Billing Code Type. There are 4 options for Billing Code type. The default Billing Code type is 00: This is the most used type. Billing is automatically displayed from reference keying. Billing Code Type 01 is used to blank out all automatic billing so the user can enter new billing information. All Reference information will stay the same, just the billing codes and amounts will be cleared. Billing Code Type 02 is the Company Standard Billing. In the Account Master a Standard Billing Invoice is created. The reference's automatic entries will be cleared and replaced with the Standard Billing. Additional billing can then be added. Call C.B.C.C if Standard Billing has not been set-up for your Account. Billing Code Types 03-10 are Custom Billing Code types that can be designed for your company's needs. Call C.B.C.C for more information. |
| To | The customer that the bill will be sent to. |
| #Pkgs | Total Packages from the 7501. |
| Weight | Total Weight from the 7501. |
| Commodity | Commodity from the 7501. |
| Port | Port from the 7501. |
| AWB# / B/L | Bill of Lading from the 7501. |
| Entry Number | Entry Number from the 7501. |
| Entry Date | Entry date from the 7501. |
| Depart | Departure date from the 7501. |
| Arrival | Arrival date from the 7501. |
| HAWB | HAWB number from the 7501. |
| Remarks | Enter any comments that you would like to show at the bottom of the body of the invoice. |
| Carrier | Carrier name from the 7501. |
| Customer Reference | Customers reference number from the 7501 |
| B/C | Enter a Billing Code or Right Click for more options (Billing Code Inquiry, Delete Line, Change Line) |
| Amount | Enter the billing amount. |
| Billing Description | A description will appear automatically when a Billing Code is entered. The user can change the Description line by deleting and typing a new description. |
| Vendor | Only used when there is a cost involved with the billing. Enter the Vendor associated with the cost. |
| Name | Vendor name. |
| Cost | Enter the cost (money paid out) |
| Total | The total amount of the invoice (including the cost amount). |
| Net | The total profit (does not include the cost amount). |
|
Button Name |
Description |
| Ok | Click Ok to Print. Some Companies will choose to print all invoices at the end of the day. If this has been selected for your company, the invoice will be sent to Invoice Waiting to be printed at a later time. To print, view or edit an invoice go to Invoice Printing. |
| Cancel | Click Cancel to exit without saving. |
Copyright © 2004 E.D. Bustard Inc.