
| Master Files - (1) Customer Master Files |
Click on the screen you wish to view, or scroll down to view all:
| Customer Master List | Customer Maintenance | Ship to Addresses |
| Notes | Email Addresses | Billing Information |
|
Summary |
The Customer Master Program allows the user to Edit, View, Add or Delete the customer information database. |
| Video | Click here to see video of this program |
To Change/View a customer :
|
Field Name |
Description |
| Customer #: | Enter the customer number if known to find it without the A-Z search buttons. |
| Reference #: | If a specific reference number is assigned to the customer number enter it here. Used for single shipment customers |
|
Button Name |
Description |
| A-Z | Click a letter to begin search list by. |
| Customer No/etc | The heading buttons will sort the list by that field. |
| Sort | The sort button resorts the customer master file index. Only used if customers are duplicated or not showing in the list. |
| Ok | Click here to choose the highlighted customer number and return to original program. |
| Edit/View | Opens the edit screen to make changes. |
| Add | Click here to add a new customer. |
| Delete | Delete's the highlighted customer. Password protected. |
| Customer No/etc | The heading buttons will sort the list by that field. |
|
Summary |
The Customer Add screen allows the user to view or add new customers. |
To Add a Customer to the Customer Master:
|
Field Name |
Description |
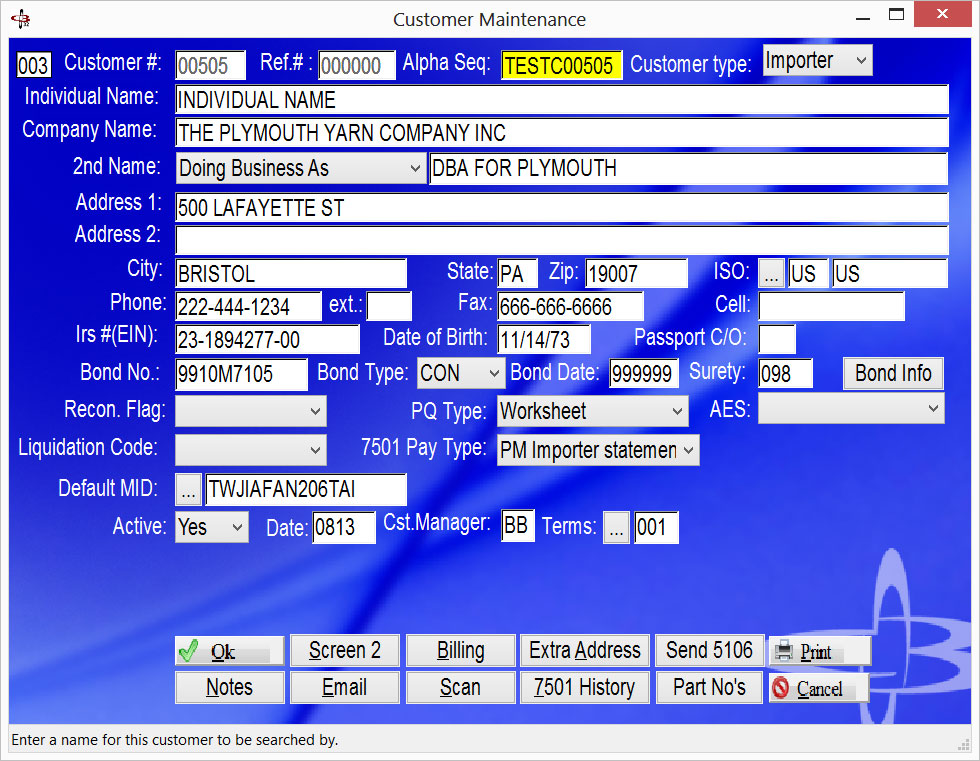
| Customer #: | Enter a valid 5 character number that has been assigned to this customer.. |
| Reference #: | If the customer is a miscellaneous customer you may enter a reference number to be associated with the account in the ref # field. Leave the ref # field blank if you do not want a reference number to be associated with the customer. |
| Alpha Seq: | The Alpha seq. field allows the user to decide alphabetical sequence of customers in the Master Display. Enter an alpha-numeric code for the customer. Ex. Customs Broker Computing Co. has Alpha seq: CBCC. ABC Forwarding has Alpha seq: FORWARD ABC. Customs Broker Computing Co. will appear in the Master Display before ABC Forwarding based on the alpha sequence of C before F. Numbers, symbols and spaces will also affect the sequence order. |
| Customer Type: | Select an option from the list to help identify the customer. |
| Individual Name: | Individual name is optional |
| Company Name: | Company name is Mandatory |
| First Line: | First line of address |
| Second Line: | Second line of address if required |
| City: | City |
| State: | State |
| Zip: | Zip |
| Country ISO: | Country Code using valid International Standard Organization Codes |
| Tel: | Telephone number |
| Fax: | Fax number |
| IRS #(EIN) | IRS number in valid formats. For export passport numbers use ZZ- then the number. |
| Date of Birth | Date of birth used with passport |
| Passport C/O | Passport country of origin |
| Bond No. | Bond number |
| Bond Type | Bond Type. Select from the drop down. |
| Bond Date | Date of bond in MMDDYY format |
| Surety Code | Enter a valid Surety Code. Don't forget to update the surety producer no. |
| Recon Flag | Reconciliation flag set to yes or blank. |
| PQ Type | PQ is a code that is used in keying from an importer's
invoice to consolidate values for use on the 7501.
B:Billing N:Normal with units W:Worksheets with units n:normal w:worksheet The data can be entered based on a worksheet supplying the codes or normal is when codes are pre-stored. "With units" refers to keying additional information showing the quantities that will be used in Landed cost. |
| AES Option | These pertain to exports using AES. The AES option is
twofold:
2:Pre-departure 4:Post-departure |
| Liquidation Code | Liquidation code. 1 or 2. |
| 7501 Pay Type | Ach pay type. Broker, Importer, Etc |
| Default MID | MID to use as a default |
| Cst Manager | Customer manager number. Used for tracking. |
| Terms | Payment terms |
| Active | Active or non active account. Yes or No. |
| Date | Date of last activity |
|
Button Name |
Description |
| Bond Info | This program lists the bond information that has been queried for this customer. |
| Ok | Click here to save and exit. |
| Screen 2 | Additional customer information |
| Billing | Opens the billing information screen. Billing codes, special billing address and Credit/No Credit settings. |
| Extra Address | Opens the extra address screen. Multiple ship to address's based on customer number and letter. |
| Send 5106 | Opens the ABI 5106 program for sending to CBP |
| Prints this customer master fields | |
| Notes | Opens the customer notes screen. Free format screen allowing for notes on this customer. |
| Opens the email address screen. Database of email address's for automatic sending | |
| Scan | Opens the scanned documents program used to organize scanned files for this customer. |
| 7510 History | Displays the tariff numbers from the last few entries done for this customer. |
| Part No's | Displays the part numbers that have been created for this customer |
| Cancel | Exits without saving. |

|
Summary |
The second screen has extra contact and default information. |
Only fields requiring extra explaination are listed below.
|
Field Name |
Description |
| Cotton License | This is supplied by cotton board and will input on cotton license field in the extra box on 7501 screen 3 |
| FEI No | FDA FEI number to default in. |
| Aii Approved | Check here for customer that will be doing automated invoicing |
| POA | Power of Attorney. Make sure you have this |
| Expires Date | Date the power of attorney expires. Message will display on 7501 screen 1 if not filled in. 999999 is for never expire |
| Turn off messages | Choose the messages you do not need to see when keying 7501. We do not recommend turning Cotton Required on. |
|
Button Name |
Description |
| Ok | Click here to save and exit. |
| Cancel | Exit without saving. |
|
Summary |
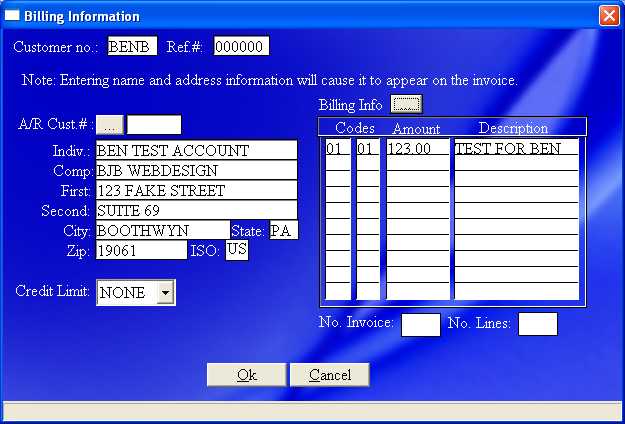
This screen allows the user to add special Billing Only Addresses, Customer Billing and select Credit settings. |
To Edit Billing Information.
|
Field Name |
Description |
| A/R Cust #: | The customer number of the company that will be paying the bill. On the accounts receivable, this is where this company's invoices will appear |
| Indiv: | Name of individual at the company which is being billed |
| Comp: | Name of company which is being billed |
| First: | First line of billing address |
| Second: | Second line of billing address, if needed |
| City: | City of billing address |
| State: | State of billing address |
| Zip: | Zip code of billing address |
| ISO: | Country Code using valid International Standard Organization Codes |
| Credit Limit: | Select: No credit limit; ignore-no limitations; no credit-do not process papers; COD |
| Billing Code | This option allows the user to create custom billing for each Customer. The billing codes entered on this screen will be automatically billed on all invoices created for this Customer. Enter a Billing Code in the first column and a price code in the second column. The Amount and Description will appear and cannot be edited from this screen. To edit Billing codes, Price codes and descriptions, go to Billing Maintenance. |
| No. Invoice: | Number of invoices on a 7501 that are free |
| No. Lines: | Number of lines on a 7501 that are free |
|
Button Name |
Description |
| Ok | Click here to accept save and exit. |
| Cancel | Exit without saving. |
|
Summary |
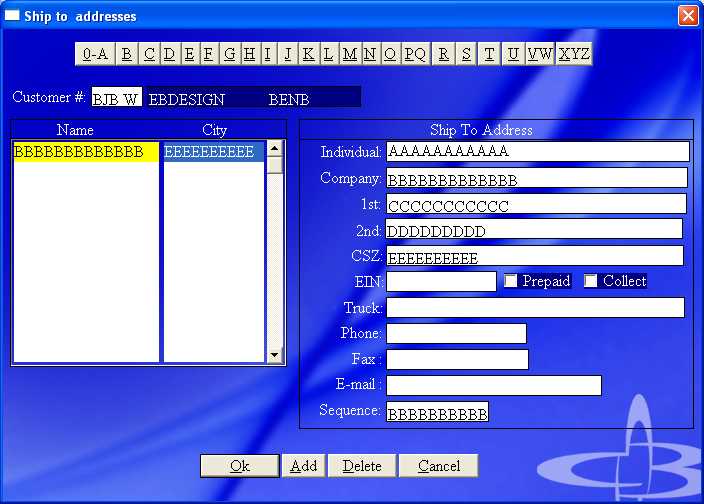
The Extra address or Ship to programs allows the user to add or delete multiple shipping addresses for this customer. |
To Add or Delete Extra Addresses:
|
Field Name |
Description |
| Individual Name: | Name of individual who will receive the shipment |
| Company Name: | Name of company to whom shipment is made |
| 1st: | First line of address |
| 2nd: | Second line of address if required |
| CSZ: | City, state, zip code |
| IRS #(EIN) | IRS number in valid formats |
| Truck: | Name of trucker delivering merchandise |
| Phone: | Phone number of company |
| Fax: | Fax number of company |
| Email: | E-mail address of company |
| Sequence: | The sequence number of this address for this company |
|
Button Name |
Description |
| Ok | Click here to accept save and exit. |
| Add | Click here to add the information. |
| Delete | Click here to delete the highlighted name. |
| Cancel | Exit without saving. |
|
Summary |
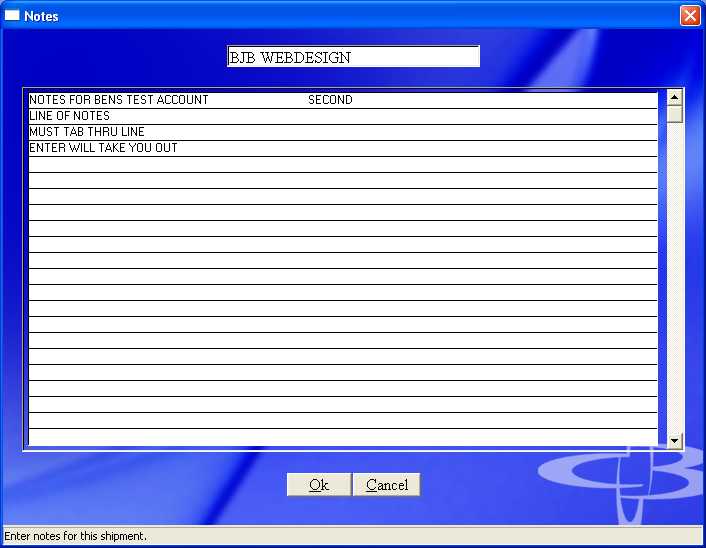
Free format screen allowing for notes on this customer. |
To Edit Notes:
|
Field Name |
Description |
| Body | Enter notes on this customer in free format. |
|
Button Name |
Description |
| Ok | Click here to accept save and exit. |
| Cancel | Exit without saving. |
|
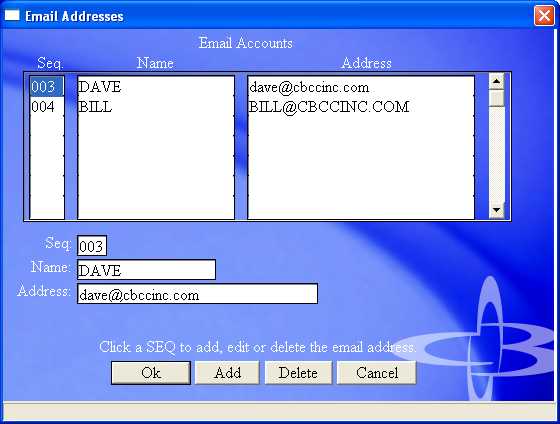
Summary |
Data base for email address under this customer number. |
To Add or Delete Email addresses.
|
Field Name |
Description |
| Seq: | Enter a valid 3 digit sequence number to keep track of the email addresses |
| Name: | Enter a name for this email address |
| Address: | Enter the email address for the name. |
|
Button Name |
Description |
| Ok | Click here to accept save and exit. |
| Cancel | Exit without saving. |
| Add | Click here to add the new email address entered. |
| Delete | Click here to delete the selected sequence. |
Copyright © 2015 E.D. Bustard Inc.